DIY & Sewing
How to sew simple unlined curtains: a beginner's step-by-step guide

Sewing your own curtains is one of the most satisfying home projects. You can choose any fabric you like, get exactly the right size for your window, and often save a lot of money compared with made-to-measure curtains. Best of all, simple unlined curtains need only straight seams, so they're an ideal project for beginners.
This guide walks you through the whole process: the tools you need, choosing fabric, measuring your window, calculating how much fabric to buy, cutting, and sewing side hems, a rod pocket and a bottom hem. We'll also cover joining fabric widths, matching patterns, simple variations and how to fix common problems.
Why make unlined curtains?
- Simple: only straight seams, no lining to attach.
- Affordable: you only buy fabric and thread.
- Light and airy: unlined curtains let soft light through, perfect for living rooms, kitchens, summer houses and anywhere you don't need darkness.
- Easy to wash: most unlined cotton and linen curtains can be machine washed.
- Great practice: once you've made unlined curtains, lined curtains are the natural next step.
Unlined curtains don't block light well, insulate much or protect the fabric from fading. For bedrooms, you can add a separate blackout lining or a blackout blind later. See our blackout curtains guide.
What you'll need
Tools
- Sewing machine with a straight stitch. A basic machine is all you need.
- Sharp fabric scissors or a rotary cutter and cutting mat.
- Tape measure and a long metal ruler or yardstick.
- Pins or sewing clips.
- Iron and ironing board: pressing is the secret to neat curtains.
- Tailor's chalk or a fabric marker.
- A large, flat surface for cutting, such as a big table or a clean floor.
- Hand-sewing needle for finishing touches.
Materials
- Curtain fabric (we'll calculate how much below).
- Matching thread, polyester all-purpose thread is strong and suitable for most fabrics.
- A curtain rod already fitted, or at least the exact position decided.
Choosing fabric for your first curtains
The right fabric makes sewing much easier. For a first project, choose:
- Medium-weight cotton or cotton-linen blend: easy to cut, press and sew, hangs nicely and doesn't slip.
- Plain fabrics or small, random patterns: no pattern matching needed.
- Fabric with a firm, even weave that doesn't stretch or fray easily.
Fabrics to avoid for beginners
- Sheers and voiles: slippery and hard to cut straight.
- Velvet: thick, shifts when sewn, and has a pile direction.
- Silk: slippery and expensive.
- Large patterns: need careful matching and extra fabric.
- Stretchy fabrics: hang unevenly.
Pre-wash your fabric
Cotton and linen can shrink by several per cent when first washed. If you plan to wash your curtains, wash and dry the fabric the same way before cutting, then press it. If the fabric is dry clean only, skip this step. Our curtain fabrics compared guide explains how different fabrics behave, and the linen curtains guide has more on linen shrinkage.
Setting up your sewing machine
- Needle: a universal needle size 80/12 suits light to medium cotton; 90/14 suits heavier cotton, linen and canvas. Start every project with a new needle.
- Stitch length: about 2.5–3 mm for seams and hems. Longer stitches look neater on thick hems and are less likely to pucker.
- Thread: wind a full bobbin before you start. Curtain hems are long, and running out mid-seam is frustrating.
- Test first: sew a few lines on a folded scrap of your fabric, check the tension looks even on both sides, and adjust if needed.
- Support the weight: curtain fabric is long and heavy. Place a table or chair beside the machine to hold the fabric so it doesn't pull on the needle and distort the stitching.
Step 1: Measure your window
Fit the rod first, or mark exactly where it will go. Then measure:
- Rod width: the length of the rod between the brackets (not including the finials).
- Drop (finished length): from the top of the rod to where you want the curtains to end: the floor, just above the floor, the sill or below the sill.
For floor-length curtains with a rod pocket, measure from the top of the rod to the floor and subtract about 1 cm so the curtains just clear the floor. Our guides on how to measure windows for curtains and the curtain length guide explain how to choose the length.
Step 2: Calculate your fabric
Choose the fullness
Fullness is how much wider the curtains are than the rod. Rod pocket curtains are gathered, so they need about 1.5 to 2.5 times the rod width. Around 2 times is a good, generous choice for medium-weight cotton. See curtain fullness explained.
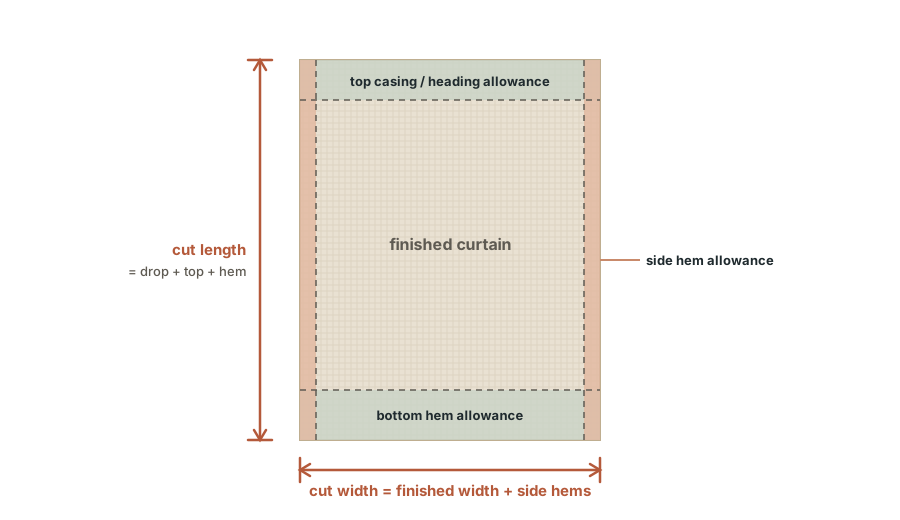
Allowances used in this guide
- Side hems: 2.5 cm folded twice = 5 cm per side, so 10 cm per panel in total.
- Rod pocket: 1.5 cm turned under plus a pocket of 7.5 cm (for rods up to about 25 mm), so 9 cm. For thicker rods, make the pocket deeper: roughly the rod's circumference divided by two, plus 2 cm of ease.
- Bottom hem: 7.5 cm folded twice = 15 cm. A deep double hem adds weight so the curtains hang straight.
The formulas
- Cut width of each panel = (rod width × fullness ÷ number of panels) + 10 cm
- Cut length of each panel = finished length + 9 cm + 15 cm
A worked example
A window has a rod 150 cm wide, and the top of the rod is 240 cm from the floor. You want two floor-length panels in fabric that's 140 cm wide.
- Finished length: 240 − 1 = 239 cm.
- Cut length: 239 + 9 + 15 = 263 cm.
- Panel width: using one full width of fabric per panel gives 140 cm cut, or 130 cm finished after the side hems. Two panels = 260 cm finished, which is 260 ÷ 150 = about 1.7 times fullness. That's a little less than 2 but looks good in medium-weight fabric and avoids joining widths, which keeps things simple.
- Total fabric: 2 × 263 cm = 526 cm. Add about 10% for shrinkage and straightening the ends: buy about 5.8 metres.
If you want more fullness, you'd use one and a half or two widths per panel, joining them with seams (explained below), and buy more fabric accordingly.
Quick reference: cut sizes
| Part of the curtain | Allowance | How it's folded |
|---|---|---|
| Each side hem | 5 cm | 2.5 cm + 2.5 cm |
| Rod pocket (rods up to 25 mm) | 9 cm | 1.5 cm + 7.5 cm |
| Rod pocket with 5 cm ruffle | 14 cm | 1.5 cm + 12.5 cm |
| Clip-ring top | 8 cm | 4 cm + 4 cm |
| Bottom hem | 15 cm | 7.5 cm + 7.5 cm |
| Seam joining widths | 1.5 cm each edge | Pressed open |
Write your own numbers down before you cut, and double-check them. "Measure twice, cut once" is the most valuable rule in curtain making.
Step 3: Cut the fabric
- Press the fabric to remove creases, so your measurements are accurate.
- Straighten the end. Fabric is rarely cut straight in the shop. Use a set square or the edge of a table to draw a line at a perfect right angle to the selvedge (the finished edge along each side of the fabric), and cut along it. With loosely woven fabrics like linen, you can pull a single thread across the width and cut along the line it leaves.
- Measure the cut length from the straight edge, mark it in several places across the width, join the marks, and cut.
- Cut the second panel the same way, using the first as a guide.
- Check the pattern direction. If the fabric has a pattern or a nap, make sure both panels will hang the same way up.
- Trim the selvedges if they're tight, puckered or printed with the maker's name. Otherwise, you can fold them inside the side hems.
Step 4: Sew the side hems
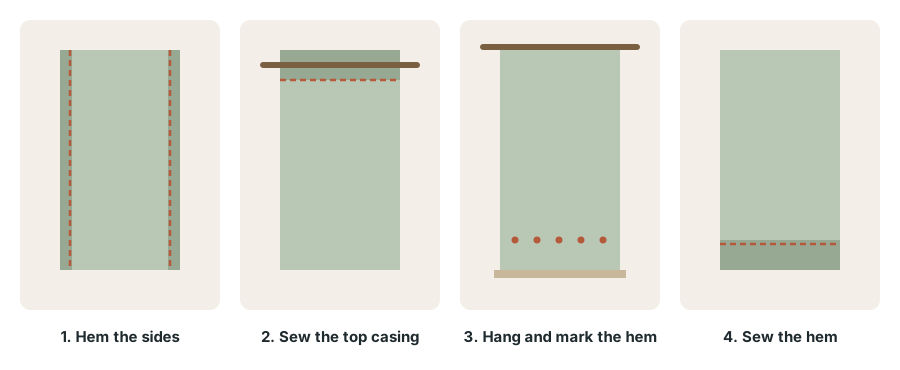
- Lay a panel face down. Along one long side, fold 2.5 cm towards you and press.
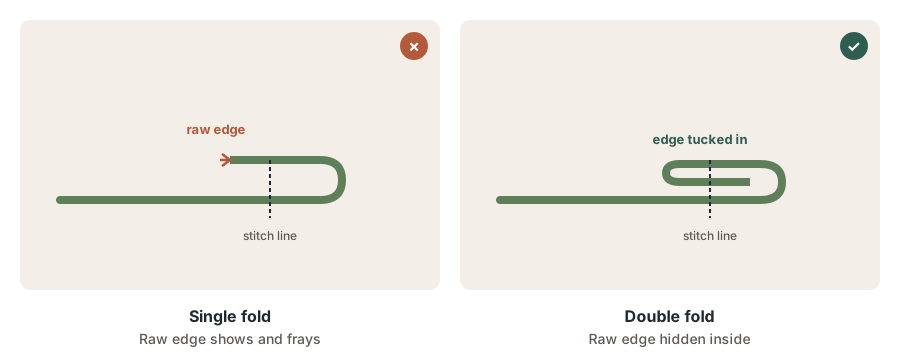
- Fold another 2.5 cm and press again, enclosing the raw edge. This is a double-fold hem.
- Pin or clip it in place.
- Sew close to the inner folded edge, about 2 mm in, using a straight stitch of medium length (about 2.5–3 mm).
- Repeat on the other side, then on the other panel.
Tip: press every fold before you sew. Pressing makes hems straight and easy to sew, and saves pinning.
Step 5: Sew the rod pocket
- With the panel face down, fold the top edge down by 1.5 cm and press.
- Fold down again by 7.5 cm and press.
- Pin, then sew along the lower folded edge, about 2 mm from the fold, from one side hem to the other. Leave both ends open so the rod can slide through.
- Slide the rod through to test it. It should go in easily but not be loose. If it's tight, unpick and make the pocket deeper.
Optional: add a header (ruffle) above the rod
For a soft frill above the rod, add extra fabric to the top: fold down 1.5 cm, then 12.5 cm (for example), and sew two lines: one at the bottom of the fold and another about 5 cm from the top. The rod goes through the lower channel and the top 5 cm forms a ruffle. Remember to add the extra fabric to your cut length, and measure the drop from the top of the ruffle.
Step 6: Hang and mark the hem
Don't sew the bottom hem yet. Hanging first gives a perfect length, because fabric settles and floors aren't always level.
- Hang both panels on the rod and spread the gathers evenly.
- Leave them for a day if you can, so the fabric relaxes.
- Mark the finished length with pins or chalk along the bottom, all the way across. Measure up from the floor in several places.
- Take the curtains down.
Step 7: Sew the bottom hem
- Measure 15 cm below your marked line and trim any excess fabric beyond that.
- Fold up 7.5 cm and press, then fold up another 7.5 cm, so the fold sits exactly at your marked line. Press well.
- At each corner, you can neaten the hem by tucking the side hem inside it. For a really professional finish, see how to hem curtains, which explains mitred corners.
- Pin and sew along the upper folded edge. For an invisible finish, hand-sew with a blind hem stitch, or use your machine's blind hem stitch.
- Press the whole curtain, then rehang.
Variations on the basic curtain
Once you've mastered the rod pocket curtain, these simple variations use the same side and bottom hems with a different top:
Clip-ring curtains
Instead of a rod pocket, finish the top with a double-fold hem of about 4 cm and hang the curtains with clip rings. They slide much more easily than a rod pocket and look smart and modern. Allow less fabric at the top (about 8 cm) and measure the drop from the bottom of the rings.
Tab top curtains
Make fabric tabs by sewing strips into tubes, turning them right side out and pressing. Fold each tab in half and sew it between the curtain top and a facing strip, spaced about 15–20 cm apart. Tab tops look relaxed and suit cottage and casual styles.
Tie top curtains
Similar to tab tops, but with pairs of fabric ties that you knot around the rod. They're easy to make and very pretty with linen.
Curtains with heading tape
Sew a ready-made pencil pleat heading tape across the top on the back of the curtain, then pull the cords to gather it to the right width and insert hooks. This gives a more tailored finish and works with rings or tracks. Read curtain headings compared to understand each style.
Eyelet curtains
Eyelet kits let you add large metal or plastic eyelets to the top of a curtain. You'll need a stiffening tape across the top and careful measuring so the eyelets are evenly spaced, with an even number per panel so both edges turn towards the wall.
Café curtains
The same method makes short café curtains for kitchens and bathrooms. See our kitchen curtain ideas for inspiration.
Joining fabric widths
If each panel needs more than one width of fabric, join them before hemming:
- Place two lengths right sides together, with the selvedges lined up.
- If the fabric is patterned, match the pattern first (see below).
- Sew a seam about 1.5 cm from the edge.
- Press the seam open. Trim the selvedges if they pucker, or clip them every 10 cm.
- For a neat finish that won't fray, zigzag or overlock the raw edges, or use a French seam on lightweight fabric.
Place half widths at the outer edges of the curtains, not in the centre where the panels meet, so the seams are less noticeable.
Matching patterns
With patterned fabric, the design should line up across joined widths and between the two panels:
- Find the pattern repeat, usually printed on the fabric label: the distance before the pattern starts again.
- Buy extra fabric: roughly one pattern repeat per cut length.
- Start each cut at the same point in the pattern, ideally with a complete motif just below the rod pocket.
- When joining widths, fold one seam allowance under, lay it over the other width so the pattern lines up, pin and then sew from the back.
Read patterned vs. plain curtains for advice on choosing patterns.
Tips for a professional finish
- Press, press, press: press every fold before sewing and press every seam afterwards.
- Use weights: small curtain weights sewn into the bottom corners of the hem help the edges hang straight.
- Match the thread to the fabric, or go one shade darker, so stitching is less visible.
- Sew all hems in the same direction to avoid twisting the fabric.
Common problems and how to fix them
The hems are wavy
Press before sewing, use pins or clips every 10–15 cm, and don't pull the fabric as it goes through the machine. Let the feed dogs move it.
The curtains are different lengths
Fabric can stretch or shrink differently. Always hang the curtains before marking the hem, and measure each panel from the floor.
The rod won't go through the pocket
The pocket is too small. Unpick the stitching and sew it lower, or use a thinner rod.
The curtains hang crooked
The fabric probably wasn't cut straight. Straighten the bottom edge before hemming, and check the side hems are parallel.
The fabric puckers along the seams
Try a slightly longer stitch, loosen the thread tension a little, and use a new, sharp needle suited to the fabric weight.
The curtains shrank after washing
Always pre-wash fabric before cutting if you'll wash the finished curtains.
Caring for your handmade curtains
- Wash as you washed the fabric before cutting: same temperature and drying method, so they don't shrink.
- Rehang them slightly damp and gently pull the hems straight; the weight of the fabric will smooth out most creases.
- Press the hems and the rod pocket area with a hot iron (as hot as the fabric allows) for a crisp finish.
- Vacuum them in place every few weeks to remove dust.
Read how to wash curtains for more detail.
Ready for the next step?
Once you're comfortable with unlined curtains, try lined curtains. The basic idea is the same, but a lining fabric is cut slightly smaller than the main fabric, sewn to it along the sides, and turned right side out before the heading and hem are finished. Lined curtains hang more fully, block more light, insulate better and protect the main fabric from the sun. The thermal curtains guide explains why lining helps keep rooms warm.
Frequently asked questions
Can I make curtains without a sewing machine?
Yes. You can hand-sew them, which takes longer but works well, or use iron-on hemming tape for all the hems and clip rings at the top. Our guide on how to hem curtains covers no-sew methods.
How much fabric do I need for curtains?
Multiply the rod width by the fullness (1.5–2.5), divide by the fabric width to find the number of widths, then multiply by the cut length (finished length + allowances). Add about 10% extra.
Is it cheaper to make your own curtains?
Usually much cheaper than made-to-measure, and often similar to or slightly more than budget ready-made curtains, but with a much wider choice of fabric and a perfect fit.
How long does it take?
A pair of simple unlined curtains takes most beginners an afternoon or a day, including measuring, cutting, sewing and pressing.
Can I add a lining later?
Yes. You can sew a separate lining with its own heading and hang it behind the curtains on the same rod, or attach a detachable lining with hooks. This is a simple way to add blackout or thermal properties.
Which side of the fabric is the right side?
The right side is usually brighter, with a clearer pattern and a smoother surface. With plain woven fabrics, both sides may look the same, so just pick one and use it consistently for both panels.
Do I need to finish the raw edges inside the hems?
Not with double-fold hems, because the raw edge is enclosed. Only seams joining fabric widths need finishing with zigzag, overlocking or a French seam.
The bottom line
Simple unlined curtains are a perfect first sewing project. Choose a medium-weight cotton or cotton-linen in a plain or small pattern, pre-wash it, measure carefully, and calculate each panel as the finished size plus allowances. Sew double-fold side hems, a rod pocket at the top, hang the curtains to mark the length, and finish with a deep double hem. Press at every step. You'll end up with beautiful, perfectly sized curtains and the skills to tackle more ambitious projects.
Keep reading
 DIY & Sewing
How to make curtains look expensive on a budget
You don't need made-to-measure curtains to get a luxurious look. These simple, affordable tricks make inexpensive curtains look custom-made and high-end.
 DIY & Sewing
How to wash, clean and iron curtains safely
Clean curtains make a room look and smell fresher. Here's how to wash, dry and iron every type of curtain without shrinking, fading or damaging it, plus how to clean curtains you can't take down.
 DIY & Sewing
How to hem curtains, with and without sewing
Curtains too long? You don't need to be an expert sewer to fix them. Here's how to measure and hem curtains with a sewing machine, by hand, with iron-on tape, or with no tools at all.