DIY & Sewing
How to hem curtains, with and without sewing

Ready-made curtains rarely fit every window perfectly. Standard lengths are designed for typical rod heights, but your rod may sit lower, your ceiling may be shorter, or you may simply want a crisper, floating hem instead of fabric dragging on the floor. Curtains that are too long look untidy, collect dust, and get caught in doors and vacuum cleaners.
The good news is that hemming curtains is one of the easiest home sewing jobs, and you don't even need a sewing machine. This guide shows you how to measure correctly, then walks you through four ways to hem: with a sewing machine, by hand, with iron-on hemming tape, and with no-sew temporary methods. It also covers special cases like lined, blackout and sheer curtains.
Before you hem: should you?
Hemming is permanent, so check a few things first:
- Can you raise the rod instead? If the curtains are only a few centimetres too long, raising the rod may solve the problem and make the room look taller too. See our guide on how high to hang curtain rods.
- Would a break look good? A curtain 2–5 cm longer than the floor rests in a gentle bend, a style many people like. Our curtain length guide explains the options.
- Will the fabric shrink? Cotton and linen that haven't been pre-washed may shrink in their first wash. Wash first (following the label), then hem.
- Has the fabric settled? Heavy or loosely woven curtains, especially linen, can lengthen slightly in the first week or two after hanging. Let them hang first.
What you'll need
- Steel tape measure
- Straight pins or fabric clips
- Tailor's chalk or a washable fabric marker
- Sharp fabric scissors
- Iron and ironing board (a towel on a table works for long curtains)
- Depending on the method: sewing machine and thread, a hand-sewing needle and thread, or iron-on hemming tape (fusible web)
- A helper, or a step ladder, for marking long curtains
Choose thread that matches the curtain colour closely, or is slightly darker, which tends to blend in better than a lighter shade.
Step 1: Measure and mark the new length
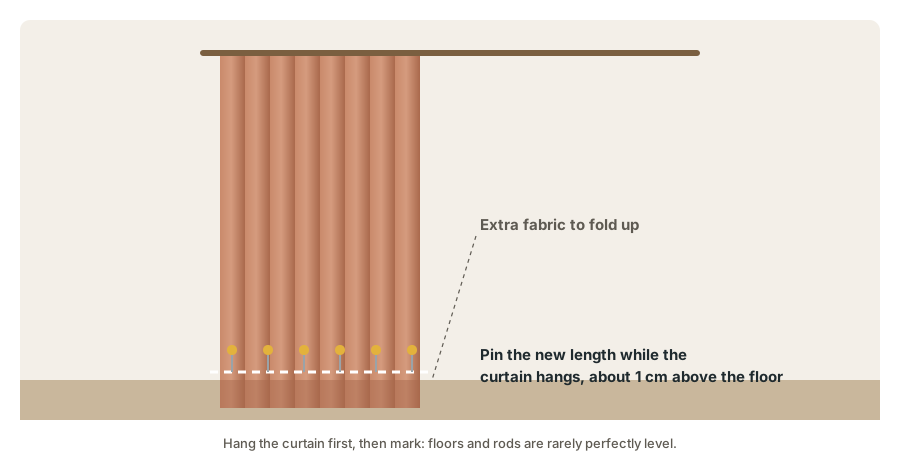
The most accurate way to mark curtains is while they're hanging on the rod, because floors and rods are rarely perfectly level.
- Hang the curtains on the rod at their final height, with all rings or hooks in place.
- Decide where the hem should finish: about 1 cm above the floor for a floating hem, just touching it, or 1 cm above the sill for sill length.
- Pin the new length across the curtain, starting at each side and then in the middle. Fold the excess fabric up behind the curtain and pin it in place so the fold sits exactly at the new length.
- Step back and check that the curtain looks right and the pinned edge is level with the floor. Adjust if needed.
- Check the other panels in the same way. If floors aren't level, each panel may need a slightly different hem.
- Take the curtain down carefully, keeping the pins in place.
If you can't mark while hanging, measure the drop instead: from the hanging point (bottom of ring, top of rod for grommets) to the floor, at the left, centre and right. Use the shortest measurement for floating hems. Our guide on how to measure windows for curtains explains the starting points for each heading.
Step 2: Plan the hem depth
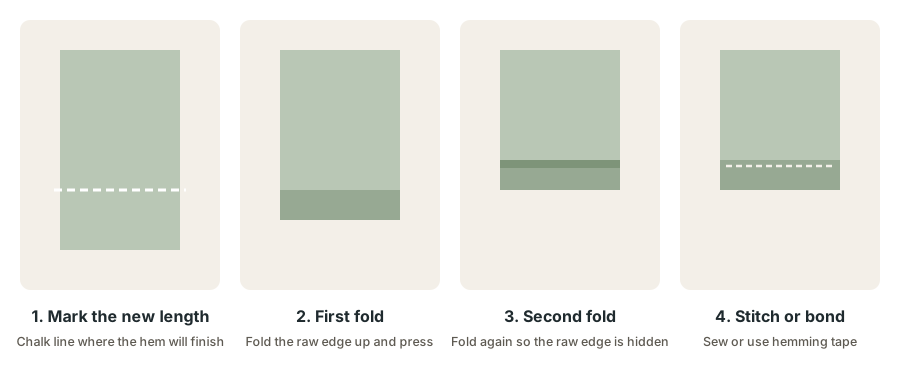
Most curtains look best with a double-fold hem, where the raw edge is folded up twice so it's completely hidden. This gives a neat, strong edge with some weight, which helps the curtain hang straight.
Typical finished hem depths:
- Floor-length curtains: about 7–10 cm (3–4 inches). Deeper hems add weight and look more professional.
- Sill-length and café curtains: about 4–5 cm (1½–2 inches).
- Sheers: a narrow hem of about 1–2 cm, or a double hem the same depth as the original.
For a double-fold hem, you need twice the finished hem depth in fabric below your marked line. For example, a 10 cm finished hem needs 20 cm of fabric below the line. Cut away anything more than that. If you have less, make a narrower hem, or use a single fold with a finished edge (described below).
Tip: try to match the depth of the curtain's original hem, so all your curtains look consistent.
Step 3: Remove the old hem (if needed)
If the curtain already has a deep hem, you can often keep it:
- Shortening a lot: cut off the old hem, then make a new one at the new length.
- Shortening a little: unpick the old hem with a seam ripper, press out the folds, and re-fold at the new length.
- Keep any hem weights or weighted tape from the original hem and put them back in the new one.
Step 4: Cut and press
- Lay the curtain flat, wrong side up, on a large table or the floor.
- Draw a line with chalk along your pinned length, using a long ruler or a straight edge.
- Measure down twice the hem depth from that line and draw a cutting line. Cut carefully along it.
- First fold: fold the raw edge up to meet the marked line, and press it with the iron (check the fabric's iron setting first).
- Second fold: fold up again along the marked line, so the raw edge is enclosed. Press firmly and pin every 10–15 cm.
- Fold the side corners neatly, tucking in any bulk so the corners are flat.
Pressing before stitching is the secret to a crisp, professional hem.
Step 5: Secure the hem
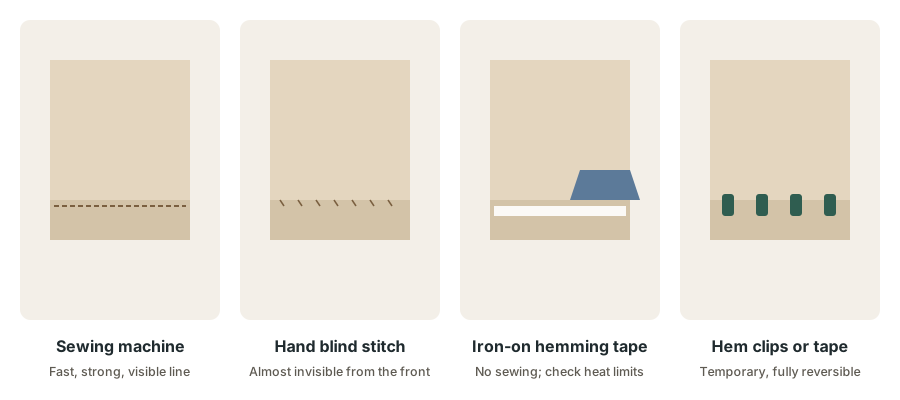
Method 1: Sewing machine
The fastest and strongest method.
- Use a medium straight stitch and thread that matches the curtain.
- Sew along the top folded edge of the hem, a few millimetres from the fold, removing pins as you go.
- Keep the curtain's weight supported on a table so it doesn't pull the fabric and make the line wavy.
- Backstitch at each end to secure the thread.
- Press the finished hem.
The stitch line will show on the front of the curtain. On plain fabrics, a matching thread makes it barely noticeable. Many sewing machines also have a blind hem stitch and foot, which creates an almost invisible machine hem.
Method 2: Hand blind stitch
Slower, but nearly invisible from the front. Ideal for heavy, lined and luxury curtains.
- Thread a needle with a single strand of matching thread and knot the end.
- Hide the knot inside the hem fold.
- Pick up just one or two threads of the main curtain fabric just above the hem fold.
- Then slide the needle along inside the fold for about 1 cm and bring it out.
- Repeat along the hem, keeping the stitches small and the thread slightly loose so the front doesn't pucker.
- Secure with a few small stitches at the end.
Method 3: Iron-on hemming tape (no sewing)
Iron-on hemming tape, also called fusible web or fusible bonding tape, is a strip of heat-activated adhesive. Placed inside the hem and pressed with a hot iron, it melts and bonds the layers together.
- Fold and press the hem as above.
- Open the second fold and lay the tape along the inside, just below the top of the fold.
- Fold the hem back over the tape.
- Cover with a damp pressing cloth (a thin cotton cloth or tea towel) and press with the iron, holding it in place for the time stated on the tape packet. Don't slide the iron back and forth, which can shift the layers.
- Work along the hem section by section, overlapping slightly.
- Let it cool completely before hanging.
Things to know:
- Follow the tape manufacturer's instructions for heat and time; different tapes vary.
- The fabric must tolerate the heat needed. Test on a hidden area or offcut first, especially with synthetics.
- Some tapes can weaken with frequent washing. Check whether your tape is washable, and wash gently.
- Heavyweight tape suits thick curtains; lightweight tape suits thinner fabrics, where heavy tape can show through or stiffen the hem.
Method 4: No-sew and temporary options
- Fabric glue designed for textiles: apply a thin line inside the fold and press. Check washability.
- Hem clips or curtain clips: fold the excess up and clip it in place inside. Fully reversible, useful for rentals or while you decide.
- Safety pins along the inside fold: a quick temporary fix.
- Double-sided fabric tape: a temporary hold for light fabrics.
- Hemming service: many dry cleaners and alteration shops hem curtains quickly and affordably.
Hemming special types of curtains
Lined curtains
Lined curtains have two layers. Ideally, hem them separately:
- Unpick the lining from the face fabric along the bottom and a little way up each side.
- Hem the face fabric to the new length with a double-fold hem.
- Hem the lining about 2–3 cm shorter than the face fabric, so it doesn't show at the bottom.
- Re-stitch the sides, and add a few loose tacks between the lining and face fabric at the hem if the originals had them.
Hemming them separately lets each layer hang naturally and handle any difference in shrinkage. If that feels too complicated, a professional alteration service is a good choice for expensive lined curtains.
Blackout and thermal curtains
- Coated (foam-backed) curtains can be damaged by a hot iron, which may melt or crack the coating. Iron-on tape isn't always suitable. Sew the hem instead, or use fabric glue, and press only the front on a low setting with a pressing cloth if needed.
- Stitching through blackout fabric creates tiny holes that can let pinpricks of light through. At the hem this rarely matters, but hand blind stitching keeps holes to a minimum.
- Triple-weave blackout behaves more like normal fabric and is easier to hem.
Our blackout curtains guide explains the different types.
Sheer curtains
- Use a fine, sharp needle and lightweight thread.
- Make a narrow double hem, or match the original hem depth so all panels look the same.
- Many voiles have a weighted cord in the hem; keep it and reinsert it.
- Iron-on tape can show through sheer fabric, so sewing is usually better.
- Place tissue paper under very fine sheers when machine sewing to stop them puckering.
Our sheer curtains guide covers sheers in more detail.
Velvet curtains
- Pin within the hem allowance only, because pins can mark velvet's pile.
- Press from the wrong side, on a towel, with steam rather than heavy pressure, to avoid crushing the pile.
- Hand blind stitch gives the most invisible finish.
Patterned curtains
Before cutting, check that the pattern will finish at the same point on every panel. If panels hang side by side, align the pattern at the hem so it looks continuous across the window.
Grommet curtains
Grommet curtains can only be shortened at the bottom, because the grommets are fixed at the top. Remember that the top of the fabric sits above the rod; mark the new length while hanging for accuracy.
Adding hem weights
Hem weights help curtains hang straight and stop them flaring or blowing about. If your curtains didn't come with weights, or you've lost them when hemming, they're easy to add:
- Corner weights are small flat weights, often covered in fabric, sewn into each bottom corner of the hem.
- Weighted tape or chain runs along the full width inside the hem, giving an even, heavy edge. It's especially useful for sheers.
- Placement: put corner weights inside the hem fold before you stitch it closed, or hand-stitch them inside an existing hem.
Hemming curtains without taking them down
For very long or heavy curtains, or when you have no large table, you can hem them in place using iron-on tape or hand stitching:
- Mark the new length with pins while the curtain hangs.
- Place an ironing board or a towel-covered board on a stool behind the curtain at hem height.
- Fold and press the hem section by section on the board.
- Secure with iron-on tape or a hand blind stitch, working along the curtain.
It's slower than working flat, but it guarantees the hem matches the floor exactly.
Dealing with uneven floors
If your floor slopes, a perfectly straight hem will float higher at one end than the other. To fix this:
- Mark while hanging, following the floor rather than a straight line.
- Choose a slight break instead of a floating hem; small differences disappear when the hem rests on the floor.
- Hem each panel separately, since one side of the window may need a different length from the other.
Using the offcuts
If you've cut a lot of fabric away, don't throw it out. Curtain offcuts can become:
- Matching tiebacks for the same curtains.
- Cushion covers that tie the room together.
- A valance or pelmet cover above the window.
- Contrast bands for another pair of curtains.
- Small projects such as fabric-covered boxes, bunting or pet beds.
Choosing thread and needles
- All-purpose polyester thread works for most curtain fabrics.
- Cotton thread suits cotton and linen curtains if you prefer natural fibres.
- Match the colour as closely as you can, or go slightly darker.
- Machine needles: a universal size 80/12 suits most medium curtain fabrics; use a heavier needle (90/14 or 100/16) for thick fabrics and a fine needle (70/10) for sheers.
- Hand needles: a medium "sharps" needle works for blind stitching most fabrics.
Using a professional hemming service
If you don't want to hem curtains yourself, alteration shops, tailors and many dry cleaners offer curtain hemming. To get the best result:
- Mark the length yourself with pins while the curtains hang, or tell them the exact finished length from the top of the curtain.
- Mention the lining, coating or weights, so they hem each layer correctly.
- Ask whether they'll keep the original hem depth and reuse any weights.
- Bring all the panels together so they match.
Hemming café curtains and short curtains
Short curtains, such as café curtains, tier curtains and sill-length panels, are easier to hem because they're smaller and lighter, but they're also seen up close, so neatness matters.
- Use a narrower hem of about 4–5 cm, which looks proportionate on short curtains.
- Machine stitching is fine on casual kitchen and bathroom curtains; a decorative contrast thread can even become a feature.
- For café curtains, the hem usually sits at sill level or just above it. Measure from the rod in the middle of the window down to the sill.
- Keep panels matching: hem pairs together and check they finish at exactly the same height.
Café curtains are a kitchen favourite; see kitchen curtain ideas for styles and fabrics. Once you are comfortable hemming, making your own curtains is the natural next step, and our guide on how to sew simple unlined curtains walks you through it.
A single-fold hem for thick fabrics
Very thick fabrics, such as heavy velvet or upholstery-weight cotton, can become bulky with a double fold. An alternative is a single-fold hem:
- Finish the raw edge with an overlocker (serger), a zigzag stitch, or pinking shears to stop fraying.
- Fold the hem up once to the marked line and press.
- Secure with a hand blind stitch or a machine blind hem.
The result is flatter and lies more neatly at the bottom of heavy curtains.
Lengthening curtains that are too short
Sometimes the problem is the opposite. If curtains are too short:
- Let down the hem if there's extra fabric folded inside.
- Lower the rod, if possible.
- Hang from clip rings, which add a few centimetres.
- Add a fabric band to the bottom in a matching or contrasting fabric. A deep contrasting band can look deliberate and stylish.
- Add a band at the top on flat-topped curtains, hidden behind a heading or valance.
Common hemming mistakes
- Measuring on the floor instead of while hanging, so the hem ends up uneven.
- Cutting before checking; always pin and check first.
- Hemming before washing fabrics that will shrink.
- Skipping the pressing, which leads to wavy, uneven hems.
- Using too much heat on synthetic or coated fabrics.
- Making the hem too shallow on long curtains, so they don't hang straight.
- Hemming lined curtains as one layer, which can cause puckering.
- Forgetting hem weights that were in the original hem.
Frequently asked questions
Can I hem curtains without a sewing machine?
Yes. Hand blind stitching, iron-on hemming tape and fabric glue all work without a machine.
Does iron-on hemming tape last?
Good-quality tape applied correctly can last well, but it may weaken with frequent hot washing. Check the packet for washability and wash gently.
How deep should a curtain hem be?
About 7–10 cm finished for floor-length curtains, and about 4–5 cm for shorter curtains. Matching the original hem depth keeps panels consistent.
Should I wash curtains before hemming?
Yes, if they're cotton, linen or another fabric that may shrink and you plan to wash them at home. Follow the care label.
Can I hem blackout curtains with iron-on tape?
Be careful: heat can damage coated backings. Sewing or fabric glue is usually safer. Test on a hidden area first.
How long does it take to hem curtains?
For one pair of standard curtains, expect about one to two hours including measuring, pressing and stitching, and less with a sewing machine or iron-on tape once you're practised.
Can I hem curtains with fabric glue?
Yes. Choose a glue made for fabric, apply a thin, even line inside the fold, press and let it cure fully before hanging or washing.
Should all my curtain panels be hemmed to the same length?
They should look the same once hung. If your floor is uneven, the panels may need slightly different cut lengths to finish at the same height above the floor.
The bottom line
Hemming curtains is a simple job when you work in the right order: hang, pin, check, press, then secure. Use a double-fold hem for a neat, weighted finish; a sewing machine for speed, hand blind stitching for invisibility, or iron-on tape when you don't sew. Take extra care with lined, blackout, sheer and velvet curtains. With a little patience, your ready-made curtains will look made to measure.
Keep reading
 DIY & Sewing
How to make curtains look expensive on a budget
You don't need made-to-measure curtains to get a luxurious look. These simple, affordable tricks make inexpensive curtains look custom-made and high-end.
 DIY & Sewing
How to sew simple unlined curtains: a beginner's step-by-step guide
Making your own curtains is easier than you think. This beginner's guide shows you how to choose fabric, measure, calculate, cut and sew simple unlined rod pocket curtains, step by step.
 DIY & Sewing
How to wash, clean and iron curtains safely
Clean curtains make a room look and smell fresher. Here's how to wash, dry and iron every type of curtain without shrinking, fading or damaging it, plus how to clean curtains you can't take down.