Measuring
How to measure windows for curtains: a step-by-step guide

The most common curtain mistake isn't the wrong colour or the wrong fabric. It's the wrong size. Curtains that are too narrow look thin and won't close properly. Curtains that are too short look like they shrank in the wash. Curtains that are too long drag on the floor and collect dust.
The good news is that measuring for curtains is easy once you know the order to do it in. The trick is to decide where the curtains will hang first, and measure second. Most measuring mistakes happen because people measure the glass and then try to make the curtains fit, instead of planning the rod position and measuring from there.
This guide walks you through the whole process in six steps, explains the numbers that confuse most people (like "fullness" and "drop"), and finishes with two worked examples you can follow with your own measurements. We'll use both centimetres and inches, because curtain sizes are sold in both.
What you'll need
- A steel tape measure. Fabric tape measures stretch and sag, which makes long measurements inaccurate. A retractable steel tape of at least 3 metres (10 feet) is ideal.
- A pencil and notepad, or the notes app on your phone. Write down every measurement immediately.
- A step ladder, so you can reach the top of the window and the ceiling safely.
- Painter's tape (optional). Useful for marking where the rod will go before you commit.
- A helper (optional). Wide windows are much easier to measure with someone holding the other end of the tape.
Always measure every window separately, even if they look identical. Windows in the same room are often a centimetre or two different, and floors are not always perfectly level.
Before you measure: make four quick decisions
Your measurements depend on a few choices, so make these decisions first. Each one takes a minute.
1. Outside mount or inside mount?
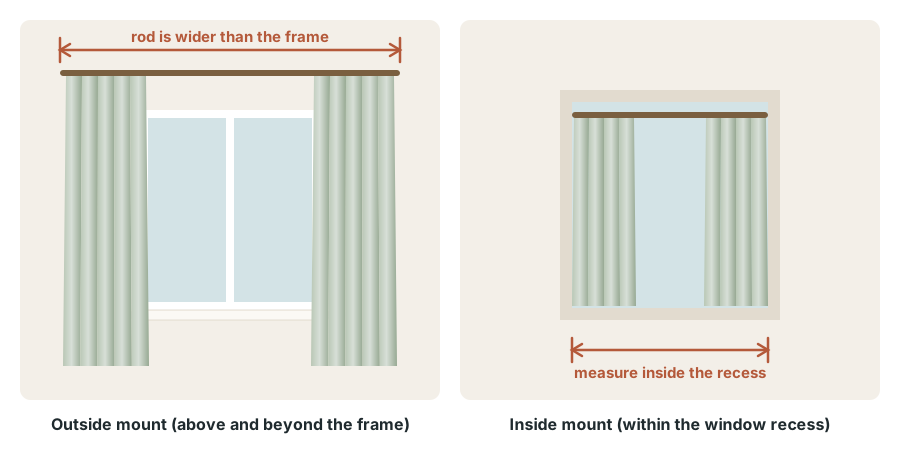
An outside mount places the rod on the wall above and beyond the window frame. This is the most common choice. It makes windows look bigger, lets the curtains open fully off the glass, and blocks more light around the edges.
An inside mount places the rod inside the window recess, between the side walls of the opening. It only works when the window is set back into a deep recess. It gives a neat, built-in look, but the curtains always cover part of the glass when open, and more light leaks around the edges.
If you're unsure, choose an outside mount. The rest of this guide assumes an outside mount unless noted.
2. Rod or track?
A rod is a pole with brackets and decorative ends, called finials. A track is a slim rail with gliders, mounted on the wall or ceiling. Both are measured the same way, but tracks can be mounted right up against the ceiling and can bend around bay windows.
3. Which heading?
The heading is how the curtain attaches to the rod: grommet, rod pocket, tab top, pinch pleat with rings, and so on. It affects two measurements: how much width you need for fullness, and where you start measuring the length. If you're not sure which heading you want, read our guide to curtain types first.
4. Which length?
Decide whether you want sill, apron, floor, break or puddle length. Floor length is the most popular choice for living rooms and bedrooms. Sill length is common in kitchens and bathrooms. You'll need this decision in Step 5.
Step 1: Decide the rod height
Every length measurement starts from the rod, so its height comes first. For an outside mount, these are the usual guidelines:
- Standard rooms: place the rod about 10–15 cm (4–6 inches) above the top of the window frame. For a more dramatic, taller look, place it about halfway to two-thirds of the way between the frame and the ceiling.
- Low ceilings or windows close to the ceiling: place the rod just below the ceiling or crown moulding, leaving a few centimetres of space so the curtains can move freely.
- Inside mount: place the rod at the top of the recess.
Mark the height lightly with a pencil or a strip of painter's tape at both sides of the window. Use a spirit level or a level app to make sure both marks are at the same height. We explain the reasons behind these numbers, and how to handle tricky ceilings, in our guide on how high and wide to hang curtain rods.
Step 2: Measure the width and choose the rod length
Measure the width of the window from the outside edge of the frame on one side to the outside edge of the frame on the other side. If your window has no frame or trim, measure the glass opening plus any visible edge. Measure at the top, middle and bottom, and use the widest number.
Next, add an extension on each side. The extension is the part of the rod that sticks out past the frame. It gives the open curtains somewhere to rest on the wall so they don't block the glass.
- Minimum extension: about 8–10 cm (3–4 inches) on each side.
- Typical extension: about 15–25 cm (6–10 inches) on each side.
- Heavy or very full curtains: up to about 30 cm (12 inches) or more on each side, because thick fabrics take up more space when open.
The formula is simple:
Rod width = window frame width + left extension + right extension
For example, a 120 cm window with 20 cm on each side needs a rod about 160 cm wide, not counting the decorative finials. Most adjustable rods cover a range, such as 120–210 cm, so pick a rod whose range comfortably includes your number.
Check for obstacles before you fix the extension: a nearby wall corner, a light switch, an air-conditioning unit, a wardrobe or another window. Reduce the extension on that side if needed.
For an inside mount, simply measure the inside width of the recess at the top, middle and bottom, and use the narrowest number so the rod fits.
Step 3: Work out the curtain width you need (fullness)
This is the step most people skip, and it's the reason so many curtains look thin. Curtains are not meant to be flat sheets of fabric. They need extra width to form soft folds when closed. That extra width is called fullness.
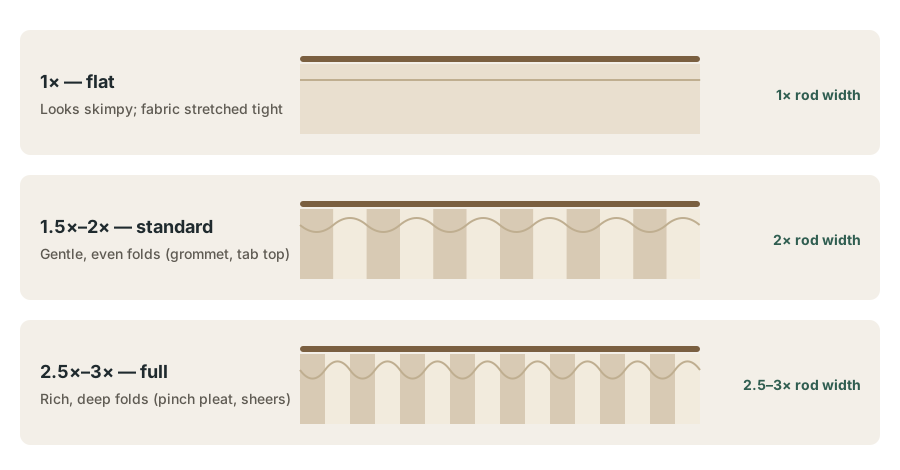
Fullness is written as a multiple of the rod width. These are typical guidelines by heading:
| Heading or fabric | Typical fullness | Total curtain width for a 160 cm rod |
|---|---|---|
| Grommet / eyelet | 1.5–2× | 240–320 cm |
| Tab top or back tab | 1.5–2× | 240–320 cm |
| Rod pocket | 2–2.5× | 320–400 cm |
| Pinch pleat (flat fabric before pleating) | 2–2.5× | 320–400 cm |
| Pencil pleat (flat fabric before gathering) | 2–2.5× | 320–400 cm |
| Sheers and voiles | 2.5–3× | 400–480 cm |
To use this table with ready-made curtains, add up the width of all the panels you'll hang on the rod and compare it to the rod width:
Total panel width ÷ rod width = fullness
For example, two grommet panels that are each 140 cm wide give 280 cm of fabric. On a 160 cm rod, that's 280 ÷ 160 = 1.75× fullness, which looks good. On a 220 cm rod, the same panels give only about 1.3×, so they'll look stretched when closed, and you'd want a third panel or wider panels.
A note on pleated curtains: made-to-measure pinch pleat curtains are often sold by their finished width after pleating, which already includes the fullness. In that case, order a finished width that covers the rod width plus a little overlap in the middle. Always read how the shop describes its widths.
A note on budget: if you have to choose, spend your money on width before you spend it on a fancier fabric. Generous width makes inexpensive curtains look expensive, while skimpy width makes expensive curtains look cheap.
Step 4: Measure the drop (from the hanging point to the floor)
The drop is the vertical distance from where the curtain hangs to where the hem will end. Where you start measuring depends on the heading, so this step needs a little care.
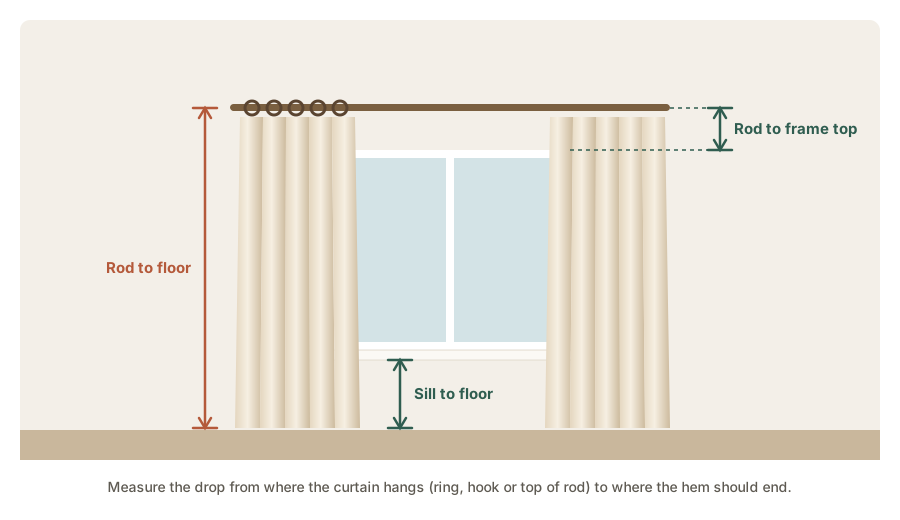
Measure from these starting points:
- Rings with clips or hooks: measure from the bottom of the ring (the small eye where the clip or hook attaches) down to the floor. The curtain hangs from that point, not from the rod itself.
- Grommet curtains: measure from the top of the rod down to the floor. The top edge of a grommet curtain sits slightly above the rod, usually a few centimetres depending on the product. So the curtain you buy should be the measured drop plus that extra amount. Check the product details, or look at the photos to see how much fabric sits above the rod.
- Rod pocket and tab top curtains: measure from the top of the rod down to the floor. Then check how the product measures its length, because some include the header above the pocket and some don't.
- Tracks: measure from the bottom of the glider (where the hook attaches) down to the floor.
Measure the drop at the left, centre and right of the window. Floors and rods are rarely perfectly level, and a difference of 1–2 cm is very common. Use the shortest measurement for floor-length curtains, so the hem doesn't drag at the lowest point.
If you haven't installed the rod yet, measure from your pencil mark. Then remember to add or subtract the ring or grommet allowance once you know exactly which product you're buying.
Step 5: Turn the drop into a finished length
Now adjust the drop for the length style you chose:
| Length style | Where the hem sits | Adjustment to your floor drop |
|---|---|---|
| Sill | About 1 cm (½ in) above the sill | Measure to the sill instead, then subtract about 1 cm |
| Apron | About 10–15 cm (4–6 in) below the sill | Measure to the sill, then add 10–15 cm |
| Floor (float) | About 1 cm (½ in) above the floor | Subtract about 1 cm |
| Floor (kiss) | Just touching the floor | No change |
| Break | Hem bends slightly on the floor | Add about 2–5 cm (1–2 in) |
| Puddle | Fabric pools on the floor | Add about 10–20 cm (4–8 in) |
For homes with robot vacuums, pets or young children, a floating floor length of about 1 cm above the floor is the most practical. It looks tailored, stays cleaner, and the curtains won't get caught.
A heavy fabric may "drop" slightly after hanging, and some natural fabrics like linen and cotton can shrink a little when washed. If you're buying linen, check whether it's pre-washed. If not, a little extra length (or a curtain you can hem) is a sensible safety margin.
Step 6: Match your measurements to curtain sizes
You now have two numbers: the total width you need and the finished length. Here's how to use them.
Ready-made curtains
Ready-made curtains come in standard sizes, which vary by country and brand. Common lengths include:
| Common length | Approximately | Typical use |
|---|---|---|
| 63 in | 160 cm | Sill or apron length on many windows |
| 84 in | 213 cm | Floor length in rooms with lower ceilings |
| 95–96 in | 241–244 cm | Floor length with the rod mounted higher |
| 108 in | 274 cm | High ceilings and tall windows |
Panel widths for ready-made curtains are commonly around 100–140 cm (about 40–55 inches) per panel. Some brands and countries, especially in the UK and Europe, list sizes differently, for example as the width of a pair. Always check the product description.
If your finished length falls between two standard sizes, choose the longer size and hem it, or adjust the rod height slightly. Moving the rod up or down a few centimetres is often the easiest way to make a standard length fit perfectly.
Made-to-measure curtains
For made-to-measure curtains, give the maker your rod width (or track width), your finished drop, and your heading choice. Ask whether they want the width of the rod or the finished curtain width, and whether the drop should be measured from the top of the rod or the bottom of the rings. Different makers use different conventions, so a quick question avoids an expensive mistake.
Worked example 1: a living room window
Maria has a living room window that is 150 cm wide. The top of the frame is 210 cm from the floor, and the ceiling is 260 cm high. She wants floor-length grommet curtains.
- Rod height: she places the rod halfway between the frame and the ceiling: 210 + (50 ÷ 2) = 235 cm from the floor.
- Rod width: 150 cm + 20 cm on each side = 190 cm.
- Fullness: for grommets, 1.5–2× gives 285–380 cm of total width. Two panels of 140 cm (280 cm total) would be slightly under 1.5×, so she chooses two panels of about 150 cm or three panels of 100 cm.
- Drop: top of rod to floor is 235 cm. Her chosen grommet curtain sits about 3 cm above the rod, so the curtain length she needs is 235 + 3 = 238 cm for a curtain that just touches the floor.
- Finished length: she wants a 1 cm float, so 237 cm. The nearest standard size is 241 cm (95 inches), which is 4 cm longer than she needs. Instead of hemming, she raises the rod by 4 cm, to 239 cm from the floor. The rod is still well below the ceiling, and the standard curtain now floats 1 cm above the floor (239 + 3 − 241 = 1 cm).
Worked example 2: a bedroom window with rings
Jon's bedroom window is 100 cm wide and 120 cm tall. He wants blackout pinch pleat curtains on rings, with a slight break on the floor to block light at the bottom.
- Rod height: 15 cm above the frame.
- Rod width: 100 cm + 25 cm on each side = 150 cm. The extra extension lets the thick blackout curtains open fully off the glass.
- Width: made-to-measure pinch pleats ordered at a finished width that covers 150 cm plus a small overlap in the centre.
- Drop: bottom of ring to floor measured at 226 cm (left), 225 cm (centre) and 227 cm (right). He uses the shortest, 225 cm.
- Finished length: for a slight break, 225 + 3 = 228 cm.
Measuring special windows
Sliding glass doors and patio doors
Measure the full width of the door frame, then add extra extension on the side where the door slides open, so the curtain stacks completely clear of the opening. Floor-length curtains are almost always the right choice. Make sure the hem floats above the floor so the curtain doesn't catch in the door track.
Bay and bow windows
Bay windows can be dressed with a bendable track, a jointed bay rod, or separate rods for each section. Measure each straight section separately, plus the angles between them, and give the measurements to the supplier. Bay windows are one of the few cases where professional measuring is worth considering.
Our full guide to bay window curtain ideas shows how to measure each section along the track line and make a paper template.
Corner windows
Measure each window separately, from the corner to the far edge of the frame. Use two rods with corner connectors, or two separate rods that meet near the corner.
Several windows on one wall
Two or three windows close together often look best under one long rod with curtains at each end and between the windows. Measure from the outside edge of the first frame to the outside edge of the last frame, then add the extensions. Long rods need a centre support bracket.
Windows above radiators, sinks or furniture
Choose sill length so the curtain stays clear. For radiators, floor-length curtains block heat from reaching the room, so sill length is usually better. Over a kitchen sink, keep the curtain well clear of water and the stove.
Windows with air-conditioning units
A wall-mounted air conditioner beside or above a window can limit how high and wide the rod can go. Measure the distance from the frame to the unit and keep the rod and curtains clear of the air flow. A ceiling track can sometimes solve tight spaces.
For more help with particular windows, see curtains for small windows and small rooms, curtains for large windows and sliding glass doors and kitchen curtain ideas. To choose the hardware before you measure, read the curtain rods and tracks guide.
Common measuring mistakes
- Measuring only the glass. Curtains hang from the rod, so measure for the rod position, not just the window.
- Forgetting fullness. Panels that only add up to the rod width look flat and thin.
- Measuring the drop from the wrong point. Rings, grommets and pockets all start the measurement in different places.
- Using a fabric tape measure. It stretches. Use a steel tape.
- Measuring once. Measure width and drop in three places, and write everything down.
- Assuming two "identical" windows are identical. Measure each one.
- Forgetting obstacles. Light switches, corners, furniture and air conditioners all affect the rod width.
Quick measuring checklist
- Decide on mount, rod or track, heading and length style.
- Mark the rod height on both sides and check it's level.
- Measure the frame width in three places; add the extensions to get the rod width.
- Multiply the rod width by the fullness for your heading to get the total curtain width.
- Measure the drop from the hanging point to the floor in three places; use the shortest.
- Adjust for your chosen length style.
- Match to ready-made sizes, or give the numbers to your curtain maker.
Frequently asked questions
Should curtains touch the floor?
For a clean, modern look, curtains should just touch the floor or float about 1 cm above it. A slight break of 2–5 cm looks relaxed and blocks more light at the bottom. A puddle is a deliberate style choice for formal rooms.
How wide should curtains be compared to the window?
The total width of all panels should be about 1.5–2 times the rod width for grommet and tab curtains, 2–2.5 times for pleated and gathered curtains, and 2.5–3 times for sheers.
How far should a curtain rod extend past the window?
Usually about 15–25 cm (6–10 inches) on each side, so the open curtains rest on the wall instead of covering the glass. Use more for heavy fabrics and less where space is tight.
Do I measure the window or the rod for curtain length?
Measure from the rod, or more precisely from the point where the curtain hangs: the bottom of the ring for ring-top curtains, or the top of the rod for grommet and rod pocket curtains.
What if my curtains are slightly too long?
You can raise the rod a few centimetres, hem the curtains, or use iron-on hemming tape for a no-sew fix.
What if my curtains are slightly too short?
Lower the rod a little if possible, or use clip rings, which add a few centimetres of length. A contrasting band of fabric sewn to the hem is another stylish fix.
The bottom line
Measuring for curtains comes down to a clear order: decide where the rod goes, measure the width and add extensions, multiply for fullness, measure the drop from the right point, and adjust for your chosen length. Write everything down, measure each window separately, and measure in three places. Follow these steps and your curtains will fit the first time, look fuller, and make your windows look bigger.
Next, read how high and wide to hang curtain rods to get the rod position just right. If you're measuring for blinds instead, see our guide to fitted horizontal blinds.
Keep reading
 Measuring
Curtain rods and tracks: a complete guide to choosing the right hardware
Rods or tracks? Which diameter, length and brackets? This guide explains every type of curtain rod and track, how to size them, and how to choose hardware that fits your curtains and windows.
 Measuring
Curtain fullness explained: how wide should curtains be?
Thin, flat curtains are the most common curtain mistake, and fullness is the fix. Here's how wide your curtains should be, with simple formulas, worked examples and fullness by heading.
 Measuring
Curtain length guide: sill, apron, floor or puddle?
Curtain length changes how tall a room feels, how big a window looks and how well curtains block light. Here's how to choose the right length for every room, and how to get it exactly right.