Measuring
How high and wide to hang curtain rods (with simple rules)

If you change just one thing about how your curtains are hung, change the position of the rod. Moving a rod a few centimetres higher and wider can make a small window look generous, a low room feel taller, and inexpensive curtains look custom-made. It also lets more daylight in when the curtains are open, and blocks more light when they're closed.
Yet most curtain rods are hung in the same spot: right on top of the window frame, barely wider than the glass. It's an understandable habit, because it seems logical to put the curtain right where the window is. But it's almost never the most flattering position.
This guide gives you simple rules for rod height and width, explains why they work, and shows how to adapt them to low ceilings, high ceilings, wide windows and awkward walls. It finishes with a step-by-step method for marking and installing the brackets.
Why rod position matters so much
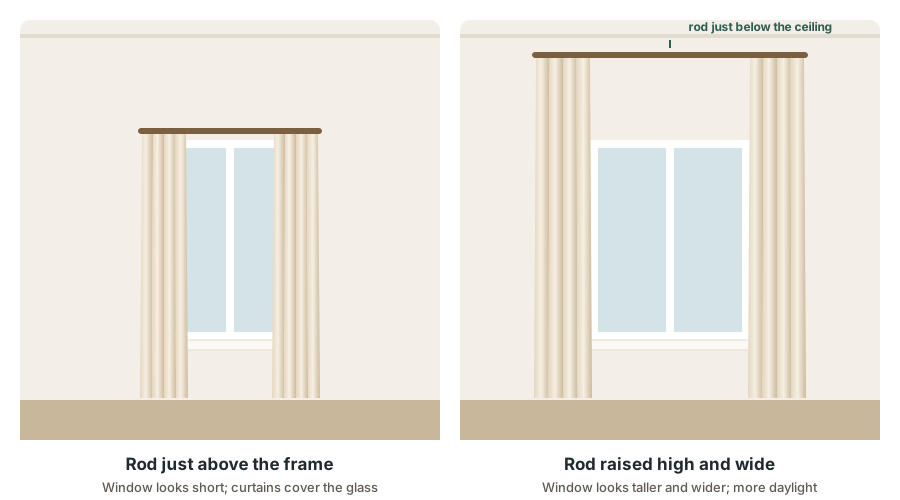
Our eyes read the curtains, not the glass, as the size of the window. When the curtains start just above the frame and stop at the edges of the glass, the window looks exactly as big as it is, or smaller, because the open curtains cover part of it. When the curtains start higher and extend wider, the eye reads the whole curtained area as "window". The room feels taller, the window feels larger, and the wall looks better balanced.
There are practical benefits too:
- More daylight: curtains that open onto the wall instead of the glass don't block light when open.
- Better light blocking: curtains that overlap the wall above and beside the frame leave fewer gaps for light to leak around, which matters for blackout curtains in bedrooms.
- Better insulation: wider coverage traps more air between the curtain and the glass, which helps thermal curtains work.
- Easier sizing: moving the rod up or down a few centimetres is often the simplest way to make a standard curtain length fit perfectly.
The quick answer
If you only remember three rules, remember these:
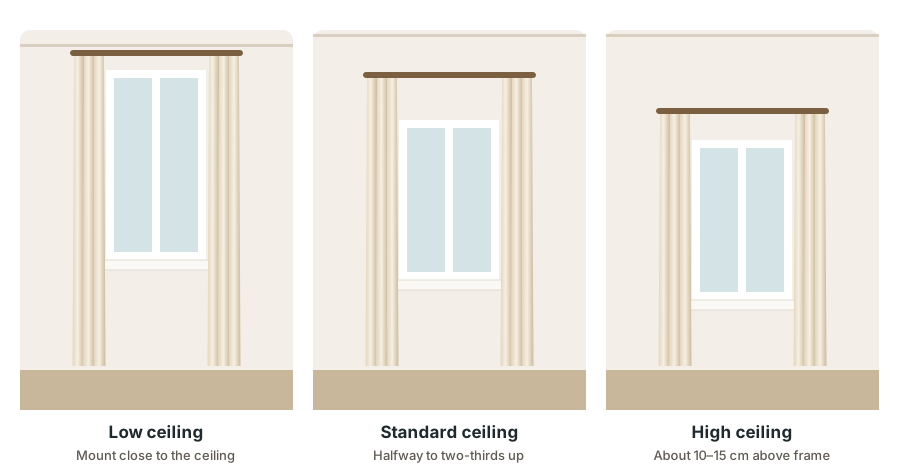
- Height: hang the rod at least 10–15 cm (4–6 inches) above the window frame. In most rooms, halfway to two-thirds of the way between the frame and the ceiling looks even better.
- Width: extend the rod about 15–25 cm (6–10 inches) beyond the frame on each side, so the open curtains rest on the wall instead of the glass.
- Length: choose curtains that reach from the rod to the floor, so the raised rod looks intentional rather than leaving a gap.
The rest of this guide explains how to adjust those rules for your room.
How high to hang a curtain rod
The basic rule: at least 10–15 cm above the frame
Placing the rod about 10–15 cm (4–6 inches) above the top of the window frame is the minimum that looks deliberate. It hides the top of the frame, gives the curtain heading some breathing room, and stops light leaking over the top of the curtains.
The better rule: halfway to two-thirds up
If there's a good amount of wall between the frame and the ceiling, raise the rod further. Measure the gap between the top of the frame and the ceiling, then place the rod halfway or two-thirds of the way up. This creates the "tall window" effect that interior designers rely on.
For example, if your frame ends at 210 cm and the ceiling is at 270 cm, there's 60 cm of wall above the window. Halfway up is 240 cm; two-thirds up is 250 cm.
How height changes with your ceiling
Low ceilings
In rooms with low ceilings, or where the window is close to the ceiling, mount the rod as close to the ceiling as you can, leaving about 2–5 cm (1–2 inches) so the rings or curtain heading can move freely. Floor-length curtains hung from just under the ceiling are the most effective way to make a low room feel taller. A ceiling-mounted track is another good option here, because it can sit flush against the ceiling.
Standard ceilings
For typical ceiling heights of around 2.4–2.7 metres (8–9 feet), the halfway-to-two-thirds rule works well. If you use standard curtain lengths, choose a height that lets those curtains reach the floor. More on that below.
High ceilings
In rooms with very high ceilings, hanging the rod right up near the ceiling can look stretched and requires very long, expensive curtains. Instead, place the rod about 10–30 cm above the frame, or at a height that lines up with other features in the room, such as door frames or the tops of other windows. The aim is balance, not maximum height.
Crown moulding or cornices
If your room has decorative moulding where the wall meets the ceiling, mount the rod just below the moulding, leaving a few centimetres of space, rather than cutting into it.
Vaulted or sloping ceilings
On a sloping ceiling, keep the rod level and set its height by the lower side of the slope, or match it to other windows in the room. A rod that follows the slope usually looks wrong and the curtains won't slide.
Let your curtain length decide the final height
Standard ready-made curtains come in set lengths, such as about 213 cm (84 inches), 241 cm (95 inches) and 274 cm (108 inches). Instead of hemming, you can often set the rod height to suit the curtain:
- Choose the length style you want, for example a hem that floats about 1 cm above the floor.
- Check where the curtain hangs from. For ring-top curtains, it's the bottom of the ring. For grommet curtains, the top of the fabric usually sits a few centimetres above the rod.
- Work backwards from the floor: curtain length + float + any ring allowance = height of the hanging point.
For example, a 241 cm curtain on clip rings with a 1 cm float needs the bottom of the rings at 242 cm. If the rings add about 4 cm between the ring bottom and the top of the rod, the top of the rod sits at roughly 246 cm. As long as that's comfortably above the frame and below the ceiling, it's a perfect fit with no sewing. Our guide on how to measure windows for curtains explains these measuring points in more detail.
How wide to hang a curtain rod
The basic rule: 15–25 cm past the frame on each side
Extend the rod about 15–25 cm (6–10 inches) beyond the frame on each side. This creates space on the wall for the open curtains to rest, so they frame the window instead of covering it.
Understanding stack-back
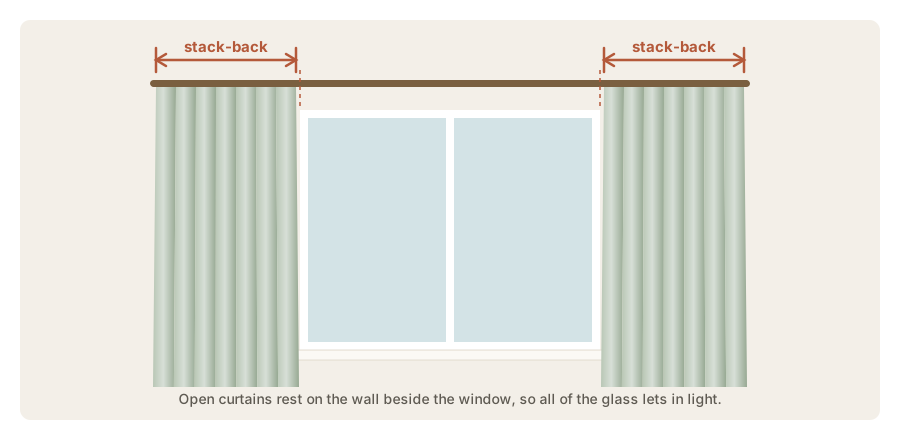
When curtains are open, the fabric bunches together on each side. The width of that bunch is called the stack-back (or stacking width). How much space it takes depends on the fabric and the heading:
- Thin fabrics and sheers stack into a narrow bundle.
- Thick, lined or blackout fabrics stack much wider.
- More fullness (more fabric for the same rod) means a wider stack-back.
- Grommet and wave headings stack neatly; rod pocket curtains often stack less tidily because they don't slide well.
The easiest way to find your stack-back is to test it. Bunch your curtains (or a similar fabric) together as tightly as they would sit when open, and measure the width. Make the extension on each side at least that wide if you want the glass completely clear.
As a rough guide, many heavy curtains need 20–30 cm (8–12 inches) or more on each side, while lightweight curtains may need only 10–15 cm.
When to go wider
- Narrow windows look wider with generous extensions.
- Blackout bedrooms benefit from extra width so the closed curtains overlap the wall and block light around the sides.
- Very full or heavy curtains need more room to stack.
- Sliding doors need extra room on the side the door opens toward, so the fabric clears the opening.
When to go narrower
- Windows near a corner or a wall: leave a few centimetres between the finial and the adjacent wall.
- Obstacles such as light switches, wall air conditioners, wardrobes or doors.
- Two windows close together, where extensions would almost meet. Consider one long rod across both windows instead.
Don't forget the finials
The decorative ends of a rod, called finials, add several centimetres to each side. Make sure there's room for them, especially near corners, door frames and walls.
Hanging high and wide is the single most effective trick for small windows, as our guide to curtains for small windows and small rooms explains. Sliding doors and picture windows need even more room to the sides; see curtains for large windows and sliding glass doors.
Rod height and width for special situations
Several windows on one wall
Two or three windows close together often look best under a single long rod, with curtains at each end and, if needed, between the windows. Set the rod at the same height for all windows in a room, even if the windows are slightly different sizes. Consistency makes the room look calm and planned.
Windows of different heights in the same room
Line up all the rods at the same height, based on the tallest window. Use floor-length curtains everywhere, and the difference in window heights mostly disappears.
Bay windows
Bay windows need a bendable track, a jointed bay rod, or separate rods with corner connectors. Keep the height consistent all the way round. Tracks are often the neatest choice because they follow the shape of the bay closely.
For tracks, poles and styling ideas, read our guide to bay window curtain ideas.
Windows with a radiator or air conditioner beneath or beside them
Keep curtains clear of heaters and of the air flow from air conditioners. You may need a shorter extension on one side, or sill-length curtains below the rod.
Windows right up against the ceiling
When there's almost no wall above the window, use a ceiling-mounted track or ceiling brackets for a rod. This lets curtains hang from the very top and cover the whole frame.
How many brackets do you need?
Brackets hold the rod to the wall. Too few, and a long rod will sag in the middle, especially with heavy curtains.
- Short rods (up to about 120–150 cm) usually need only two brackets, one at each end.
- Longer rods need a centre support bracket. Many manufacturers recommend one for rods longer than about 150–180 cm, and more for very long rods or heavy fabrics. Always follow the instructions that come with your rod.
- Grommet curtains can't slide past a centre bracket. If you use one, place it where the two panels meet, or use a special "pass-through" bracket and rings.
Place the end brackets just outside the window frame, or a few centimetres in from the ends of the rod, so the finials stick out beyond them.
Wall types and fixings
The right screws and plugs depend on what your wall is made of:
- Concrete or hollow block walls: very common in many homes. Use a masonry drill bit and plastic wall plugs that match the screw size.
- Solid brick: also needs a masonry bit and wall plugs.
- Plasterboard (drywall): screw into a timber or metal stud behind the board if one is in the right place. Otherwise, use plasterboard anchors rated for the weight of your rod and curtains.
- Timber frames: wood screws can go straight in.
Before drilling, check for hidden pipes and electrical cables. A simple stud and cable detector is inexpensive and worth having. Heavy blackout or velvet curtains put real strain on brackets, so don't rely on the small screws that sometimes come in the box if they're not suitable for your wall.
Step-by-step: marking and installing the brackets
- Decide the height. Use the rules above, and check it against your curtain length.
- Mark the height on one side. Measure up from the floor (or from the top of the frame) and make a small pencil mark.
- Mark the width. Measure out from the edge of the frame by your chosen extension and mark it at the same height.
- Repeat on the other side. Use a spirit level, a laser level or a long straight board with a level on top to make sure both marks are exactly level. Floors and frames are not always level, so the level tool is more reliable than measuring from the floor twice.
- Hold up a bracket. Line it up with the mark and mark its screw holes. The rod sits slightly above or below the screw holes depending on the bracket design, so check where the rod will actually rest.
- Drill and fix. Drill the holes, insert wall plugs if needed, and screw the brackets on firmly.
- Add a centre bracket if needed. Line it up with a string or level between the two end brackets.
- Hang the curtains and test. Thread the rings or grommets onto the rod, place it on the brackets, add the finials and open and close the curtains a few times.
Tip: before drilling, tape a strip of painter's tape at your planned rod height and step back across the room. It's an easy way to see whether the height looks right.
Hanging a double rod for layered curtains
A double rod holds two layers on one set of brackets: usually sheers on the inner rod, closest to the window, and heavier curtains on the outer rod. The same height and width rules apply, with a few extra points:
- Height: both rods sit at almost the same height, so one set of measurements covers both. The inner rod is usually slightly lower or level with the outer rod, depending on the bracket design.
- Width: the outer rod is normally a little longer than the inner rod. Make the outer rod's extension wide enough for the heavier curtains to stack completely clear of the glass.
- Lengths: because the two rods may sit at slightly different heights, measure the drop for each layer separately. For a neat look, both layers should end at the same distance from the floor.
- Depth: check that the bracket projects far enough from the wall to clear any window handles, sills or blinds behind the curtains.
Double rods put more weight on the brackets, so fix them securely and use a centre bracket on longer runs.
Choosing the right rod for the position
The position you choose also affects which rod you should buy.
Rod diameter
Thin rods of around 16–19 mm suit light curtains and short spans. Medium rods of around 25–28 mm are the most common choice for living rooms and bedrooms. Thick rods of 30 mm or more suit heavy curtains, long spans and large rooms, where a thin rod would look lost or sag. If you're using grommet curtains, make sure the rod fits comfortably through the grommet rings.
Bracket projection
Projection is how far the rod sits out from the wall. Most brackets hold the rod about 7–12 cm from the wall. Choose a larger projection if the window frame sticks out, if there's a deep sill, or if you have blinds behind the curtains. A larger projection also lets curtains hang straight without brushing the frame.
Return or wraparound rods
Some rods curve back to the wall at each end, called "return" or "wraparound" rods. The curtain wraps around the curve, closing the gap at the sides where light usually leaks in. They're excellent for blackout bedrooms.
Finish
Choose a finish that suits the room: matte black for modern or industrial rooms, brass or bronze for warm traditional rooms, white or wood for light, relaxed spaces. Matching the finish to cabinet handles, light fittings or picture frames makes the room feel coordinated.
For help choosing the rod or track itself, including diameters, brackets and finishes, see our curtain rods and tracks guide.
Options for renters and no-drill walls
If you can't drill into the walls, you still have choices, though they suit lighter curtains best:
- Tension rods fit snugly inside a window recess using spring pressure. They're ideal for café curtains, sheers and small windows, but they only work for inside mounts.
- Adhesive brackets stick to the wall or frame. Check the weight limit carefully, and test them with the actual curtains before relying on them.
- Frame-mounted brackets hook over or clamp onto some window frames without screws. They only fit certain frame types.
Many landlords are happy for tenants to drill a few small holes if they're filled when moving out. It's worth asking, because properly fixed brackets are much safer for heavy or long curtains.
Common mistakes to avoid
- Hanging the rod directly on the frame. The window looks smaller and light leaks over the top.
- Making the rod barely wider than the glass. The open curtains cover the window and block daylight.
- Raising the rod but keeping short curtains. A high rod with curtains that stop above the floor looks unfinished. Pair a raised rod with longer curtains.
- Different heights in the same room. Keep all rods level with each other.
- Skipping the centre bracket. Long rods sag, and sagging rods make curtains stick.
- Using the wrong wall fixings. Brackets pulled out of a wall can damage it and bring down the whole set-up.
- Forgetting the finials. They need space, especially near corners.
Frequently asked questions
How high should a curtain rod be above the window?
At least 10–15 cm (4–6 inches) above the frame. In most rooms, halfway to two-thirds of the way between the frame and the ceiling looks best. In low rooms, mount it just below the ceiling.
How far past the window should a curtain rod extend?
About 15–25 cm (6–10 inches) on each side, or wider for heavy curtains, so the open curtains rest on the wall.
Should curtain rods go to the ceiling?
In rooms with low or standard ceilings, hanging the rod close to the ceiling makes the room look taller. In rooms with very high ceilings, it's usually better to hang the rod lower and keep the proportions balanced.
Should all curtain rods in a room be the same height?
Yes. Matching heights make the room look planned and calm, even if the windows themselves are different sizes.
How much weight can a curtain rod hold?
It depends on the rod's thickness, its length, the number of brackets and how well the brackets are fixed to the wall. Check the manufacturer's guidance, use a centre bracket on long rods, and use fixings that suit your wall.
Can I hang curtains without drilling?
For light curtains, tension rods (inside a window recess) and some adhesive or no-drill brackets can work. For heavy, long or blackout curtains, drilled brackets are much safer.
The bottom line
Hang the rod higher than the frame, wider than the window, and choose curtains long enough to reach the floor. Adjust for your ceiling height and your curtains' stack-back, keep every rod in the room at the same height, and fix the brackets securely. These simple changes cost almost nothing, yet they're the difference between curtains that look ordinary and curtains that look professionally fitted.
Ready to buy? Start with our guide to curtain types, then follow how to measure windows for curtains.
Keep reading
 Measuring
Curtain rods and tracks: a complete guide to choosing the right hardware
Rods or tracks? Which diameter, length and brackets? This guide explains every type of curtain rod and track, how to size them, and how to choose hardware that fits your curtains and windows.
 Measuring
Curtain fullness explained: how wide should curtains be?
Thin, flat curtains are the most common curtain mistake, and fullness is the fix. Here's how wide your curtains should be, with simple formulas, worked examples and fullness by heading.
 Measuring
Curtain length guide: sill, apron, floor or puddle?
Curtain length changes how tall a room feels, how big a window looks and how well curtains block light. Here's how to choose the right length for every room, and how to get it exactly right.