DIY & Sewing
How to hang curtains: a beginner's step-by-step guide

Hanging curtains is one of the most satisfying DIY jobs in the home. In an hour or two, a bare window becomes a finished feature, and the room immediately feels softer, warmer and more private. It's also a job that many people put off, because drilling into walls feels risky and it's not obvious where the rod should go.
The good news is that hanging curtains is straightforward when you follow the steps in the right order: plan, measure, mark, check level, drill, fix the brackets, hang the curtains, and then dress them so they fall nicely. This guide walks you through each step for a standard curtain rod, with tips for different wall types, every curtain heading, and the most common problems.
Before you start: safety first
- Use a stable step ladder, not a chair. Make sure it's fully open and on a level floor.
- Check for hidden pipes and cables before drilling. Electrical cables often run vertically above and below switches and sockets, and horizontally near the ceiling. A cable and stud detector is inexpensive and worth using.
- Wear eye protection when drilling, especially into concrete or brick, which produces dust and chips.
- Have a helper for long rods. Holding a 3-metre rod level while marking it is much easier with two people.
- Unplug or switch off nearby lamps or appliances whose cables run near your drilling spot.
Tools and materials
Tools
- Steel tape measure
- Pencil
- Spirit level (or a laser level, or a level app on your phone)
- Drill, with the right bit for your wall (masonry bit for concrete, block and brick; wood or general bit for timber; a smaller bit for plasterboard anchors)
- Screwdriver or a screwdriver bit for the drill
- Step ladder
- Cable and stud detector (recommended)
- Painter's tape (optional, for marking without pencil marks)
- Steamer or iron (for the final dressing)
Materials
- Curtain rod with brackets and finials (or a curtain track)
- Screws and wall plugs or anchors suited to your wall. The screws supplied with a rod aren't always right for every wall
- Curtains, plus rings, clips or hooks if your heading needs them
- Tiebacks or holdbacks (optional)
Step 1: Plan the rod position
Where you put the rod decides how the curtains look, so plan this first. The usual guidelines for a rod above the window are:
- Height: at least 10–15 cm (4–6 inches) above the window frame, or halfway to two-thirds of the way between the frame and the ceiling. In low rooms, just below the ceiling.
- Width: extend the rod about 15–25 cm (6–10 inches) beyond the frame on each side, so the open curtains rest on the wall rather than covering the glass.
Then check the plan against your curtains. If you already have curtains, work backwards from their length so they reach the floor at the height you choose. Our guides on how high and wide to hang curtain rods and curtain length explain this in detail.
Tip: run a strip of painter's tape across the wall at your planned height, then step back across the room. If it looks too low or too high, adjust it now. It's much easier than moving holes later.
Step 2: Mark, level and check
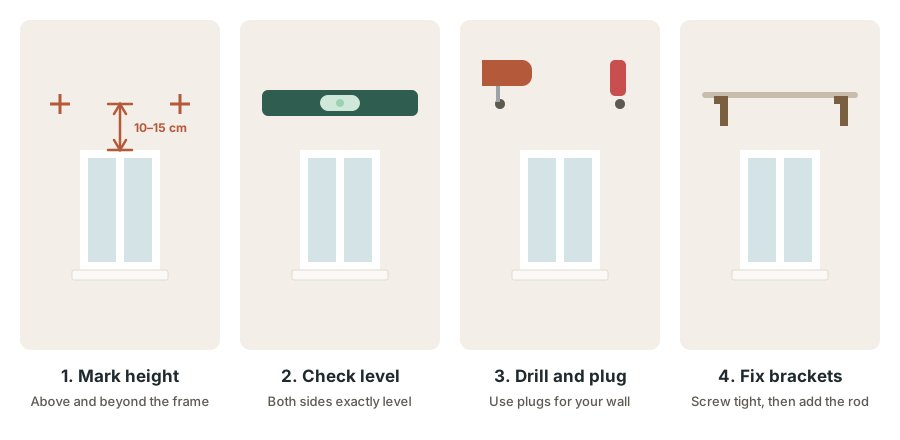
- Mark the first bracket. Measure up from the top of the window frame to your chosen height, then out from the side of the frame by your chosen extension. Make a small pencil cross.
- Mark the second bracket on the other side the same way.
- Check that the marks are level. Place a spirit level on a straight board or the rod itself, resting on both marks. Don't rely only on measuring from the floor or the ceiling, because neither is guaranteed to be level. A level rod matters far more than equal distances from an uneven floor.
- Hold a bracket on the mark and draw through its screw holes. Notice where the rod will sit in the bracket. On many brackets, the rod sits a few centimetres above or below the screw holes, which affects the final height.
- Mark a centre bracket if the rod is long. Many manufacturers recommend one on rods longer than about 150–180 cm, especially with heavy curtains. Line it up with a level or a string between the two end marks.
Check one more time for pipes and cables at each mark before you drill.
Step 3: Drill the holes
The right method depends on what your wall is made of. Tap the wall and look at any existing holes to help identify it.
Concrete, concrete block or brick walls
These are very common, and they hold curtain rods extremely well when fixed properly.
- Fit a masonry bit that matches the size printed on your wall plugs.
- Use the drill's hammer setting if it has one.
- Drill straight in to a depth slightly longer than the plug.
- Vacuum or blow out the dust.
- Tap the plug in until it's flush with the wall.
In hollow concrete blocks, the drill may suddenly break through into a hollow space. Ordinary plugs can then spin or pull out. If that happens, use plugs designed for hollow walls, or move the bracket slightly to find solid material.
Plasterboard (drywall)
- If there's a stud behind the mark (use a stud detector), screw directly into the timber or metal stud. This is the strongest option.
- If there's no stud, use plasterboard anchors rated for the weight of your rod and curtains, such as spring toggles, metal self-drill anchors or hollow-wall anchors. Avoid small plastic plugs, which can pull out under heavy curtains.
Timber
Drill a small pilot hole, then screw directly into the wood. No plugs are needed.
Window frames
Avoid screwing into uPVC or aluminium window frames unless the manufacturer allows it. You can damage seals and weaken the frame.
Step 4: Fix the brackets
- Hold the bracket over the holes and drive the screws in firmly. Don't over-tighten into plugs, which can strip them.
- Check each bracket is upright and solid. Give it a gentle tug; it shouldn't move.
- Fix the centre bracket last, lined up with the end brackets.
- Place the rod in the brackets and check with the level once more.
Step 5: Put the curtains on the rod
How you attach the curtains depends on the heading. Take the rod down from the brackets for this step; it's easier on the floor or a table.
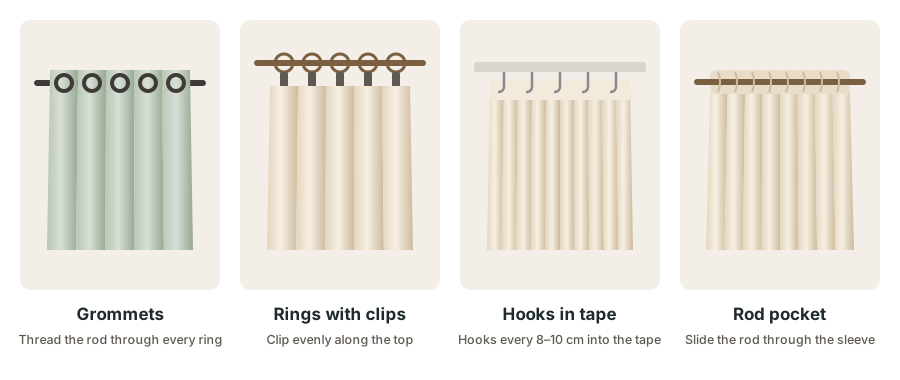
Grommet (eyelet) curtains
Thread the rod through the grommets, weaving in and out. Make sure the first and last grommet on each panel go behind the rod toward the wall, with the fabric facing into the room. This lets the outer edge of the curtain fold back toward the wall, which looks neater and blocks more light. If there's a centre bracket, put one panel on each side of it, because grommets can't slide past it.
Curtains on rings with clips
Slide the rings onto the rod, including one extra ring outside each end bracket to hold the outer edge of the curtain in place. Clip the curtain on, starting with the two corners, then the middle, then fill in the gaps so the clips are evenly spaced, usually about 10–15 cm apart.
Pinch pleat curtains with pin hooks
Insert a pin hook into the back of each pleat, at the same height for every hook. Then hook each one into the eye of a ring or a track glider. Insert a hook at each outer edge too. The height of the hook in the pleat controls how much of the heading sits above the rod: insert it lower in the pleat to hide the rod, higher to show it.
Pencil pleat curtains with gathering tape
- Knot the cords at one end of the tape (usually the outer edge) so they can't pull through.
- At the other end, pull the cords gently while pushing the fabric along to gather it, until the curtain is the width you need, roughly half the rod width for each panel plus a little overlap.
- Spread the gathers evenly, then tie the loose cords neatly; don't cut them, so you can ungather the curtain for washing.
- Insert hooks into the tape pockets about every 8–10 cm, and one at each end.
- Choose the pocket row: hooks in the bottom row leave more fabric standing above the hook, which hides a track; hooks in the top row let the curtain hang below a decorative pole so the pole stays on show. The middle row is in between.
Rod pocket curtains
Slide the rod through the pocket. Cover the end of the rod with a plastic bag or a sock first so it doesn't snag the fabric. Spread the gathers evenly along the rod.
Tab top curtains
Slide the rod through each tab, keeping the tabs evenly spaced.
Curtain tracks
Hook the curtain onto the gliders, starting from the outer ends and working toward the centre. Make sure the number of hooks matches the number of gliders on each side, and remove or add gliders if needed.
Step 6: Hang the rod and add the finials
- Lift the rod with the curtains into the brackets.
- Tighten any locking screws on the brackets so the rod can't roll or lift out.
- Screw on the finials.
- Open and close the curtains a few times to check they slide freely and the rod doesn't flex.
Step 7: Dress and train the curtains
New curtains often come out of the packet creased, and the folds don't fall evenly at first. A little dressing makes a big difference.
Remove creases
Steam the curtains while they hang, working from the top down. A handheld steamer is ideal. Alternatively, iron them before hanging on the setting shown on the care label, avoiding any blackout coating. Many creases also drop out on their own within a few days as the fabric hangs.
Train the folds
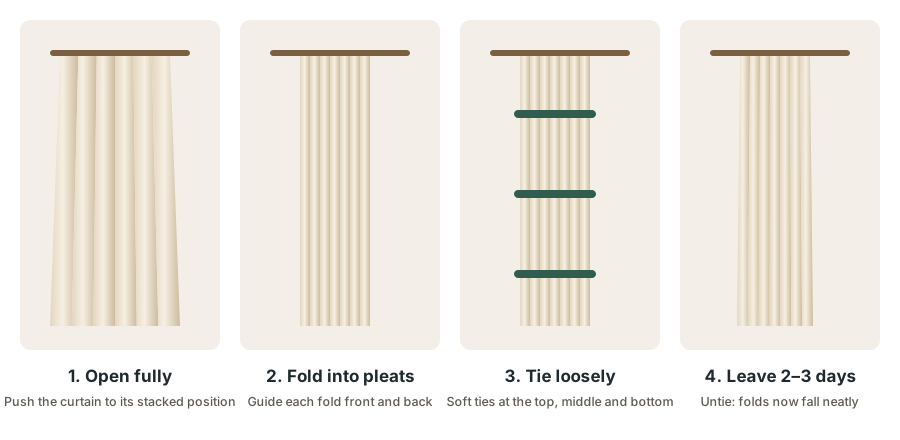
- Open the curtains fully to their stacked position.
- Fold them into even pleats from top to bottom, following the folds formed by the grommets, rings or pleats at the top. Alternate one fold toward the room and one toward the window, like a fan.
- Tie them loosely with strips of fabric, ribbon or soft string at the top, middle and bottom. Don't tie tightly, or you'll leave marks.
- Leave them tied for two or three days. In humid weather, or after steaming, the fabric sets into the new shape faster.
- Untie them. The curtains will now fall in neat, even folds whenever they're opened.
Step 8: Add tiebacks or holdbacks (optional)
Tiebacks hold open curtains to the side and add a decorative touch. Fix the hook or holdback about one-third of the way up from the floor for a classic look, or at about window-sill height. Place it at the outer edge of the curtain stack so the curtain drapes gracefully. Keep tieback cords out of reach of young children.
Hanging curtains on a track
Curtain tracks are slim rails with gliders. They're installed on the wall or the ceiling, and they suit bay windows, wave curtains and ceiling-height curtains.
- Choose wall or ceiling mounting. Ceiling mounting suits windows close to the ceiling and gives the most "built-in" look.
- Mark the bracket positions along the track line. Track brackets are usually spaced more closely than rod brackets; follow the spacing in the instructions.
- Check the line is straight and level using a level or a chalk line.
- Drill and fix the brackets with fixings suited to your wall or ceiling. For plasterboard ceilings, fix into joists wherever possible.
- Clip the track onto the brackets, then fit the end stops.
- Hook the curtains onto the gliders, working from the outer ends inward.
For bay windows, bendable tracks can be shaped by hand or with a bending tool to follow the bay. Measure each section carefully, and bend gently to avoid kinks that stop the gliders running smoothly.
Hanging curtains over sliding doors
- Extend the rod well past the door on the side it opens, so the curtains stack completely clear of the opening.
- Use enough centre brackets for the long rod. With grommet curtains, plan which panels sit on each side of each bracket.
- Keep the hem floating about 1 cm above the floor, so it doesn't catch in the door track.
- Consider a track or a pass-through bracket if you want the curtains to slide past the centre supports.
Looking after your curtains and hardware
- Check the brackets every few months, especially with heavy curtains. Tighten any screws that have loosened.
- Vacuum the curtains with a soft brush attachment to remove dust, and wipe the rod occasionally so the curtains keep sliding smoothly.
- Open and close curtains from the leading edge or with a curtain wand, rather than pulling the middle of the fabric. This reduces wear and keeps the folds neat.
- Wash or clean curtains according to the care label, and re-train the folds after washing.
Hanging curtains without drilling
If you rent or can't drill, these options work for lighter curtains:
- Tension rods fit inside a window recess using spring pressure. Ideal for café curtains, sheers and small windows.
- Adhesive hooks and brackets designed for curtain rods. Check the weight limit carefully and test them before relying on them.
- Frame-mounted brackets that clamp onto certain window frames without screws.
For heavy, long or blackout curtains, drilled brackets are much safer. Many landlords allow a few small holes if they're filled when you move out, so it's worth asking.
Hanging layered curtains on a double rod
- Install the double brackets exactly as you would single ones.
- Put the sheers on the inner (back) rod, closest to the window.
- Put the heavier curtains on the outer (front) rod.
- Measure the length for each layer separately, since the two rods may sit at slightly different heights.
- Make sure the bracket projection is deep enough for both layers to clear the window frame, handles and sill.
Troubleshooting common problems
The rod sags in the middle
Add a centre bracket, or use a thicker rod. Heavy curtains on long, thin rods almost always sag.
The curtains won't slide easily
- For grommet curtains, check the rod isn't too thick for the rings, and wipe the rod clean.
- For rings, use slightly larger rings than the rod diameter.
- For tab tops and rod pockets, some friction is normal. Rubbing a little wax or silicone spray on the rod helps; test on a hidden spot first.
- On tracks, clean the channel and check gliders aren't damaged.
The curtains are too long or too short
Adjust the rod height if the brackets allow, use clip rings to add length, or hem the curtains. Our curtain length guide covers all the fixes.
The curtains don't meet in the middle
You need more fullness: wider panels or an extra panel. See our guide to curtain fullness.
Light leaks around blackout curtains
Raise and widen the rod, overlap the panels in the middle, and consider a wraparound rod. Our blackout curtains guide explains each fix.
The bracket is loose
The plug may have spun or the hole may be too large. Remove the screw, fill the hole, and re-drill slightly to one side, or use a larger plug or a hollow-wall anchor.
The curtains flare out at the bottom
Train the folds for a few days. If they still flare, add small curtain weights to the bottom corners.
Mistakes to avoid when hanging curtains
- Drilling before checking for cables and pipes. Always check first.
- Measuring both brackets from an uneven floor or ceiling. Use a level between them instead.
- Using the wrong fixings. Small plastic plugs in plasterboard, or plugs that don't match the drill bit size, can let brackets pull out.
- Forgetting the centre bracket on a long rod, which leads to sagging.
- Putting grommet curtains on in the wrong order, with the end grommets in front of the rod, so the edges flap forward.
- Hanging the rod before deciding the curtain length. Check that your curtains will reach the floor from the planned height.
- Skipping the dressing step. A few minutes of steaming and a couple of days of training make curtains look far more professional.
How long does it take?
For one standard window with a rod and two brackets, most people take 30–60 minutes the first time, including marking, drilling and hanging. A long rod with a centre bracket, or a double rod, may take a little longer. Training the folds then takes a few days, but you only need a couple of minutes to tie them.
Frequently asked questions
How high should I hang my curtains?
At least 10–15 cm above the window frame, or halfway to two-thirds of the way to the ceiling in most rooms. In low rooms, mount the rod just below the ceiling.
Do I need a centre bracket?
For rods longer than about 150–180 cm, or with heavy curtains, yes. Follow the rod manufacturer's guidance.
Which way do grommet curtains go on the rod?
Start and finish each panel with the grommet behind the rod, toward the wall, so the outer edges fold back neatly.
Can I hang curtains on a concrete wall?
Yes. Use a masonry drill bit, the hammer setting on your drill, and wall plugs sized for your screws. Concrete holds brackets very securely.
How do I get creases out of new curtains?
Steam them while they hang, or iron them on the correct setting before hanging. Many light creases drop out on their own within a few days.
How do I make curtains hang nicely?
Choose enough fullness, hang the rod level, steam out creases, and train the folds by tying them loosely for two or three days.
The bottom line
Plan the rod position first, mark both brackets and check they're level, use the right fixings for your wall, and fix the brackets firmly. Attach the curtains in the way that suits their heading, then steam and train them so they fall in neat, even folds. With these steps, even a first-time DIYer can hang curtains that look professionally fitted.
Keep reading
 DIY & Sewing
How to make curtains look expensive on a budget
You don't need made-to-measure curtains to get a luxurious look. These simple, affordable tricks make inexpensive curtains look custom-made and high-end.
 DIY & Sewing
How to sew simple unlined curtains: a beginner's step-by-step guide
Making your own curtains is easier than you think. This beginner's guide shows you how to choose fabric, measure, calculate, cut and sew simple unlined rod pocket curtains, step by step.
 DIY & Sewing
How to wash, clean and iron curtains safely
Clean curtains make a room look and smell fresher. Here's how to wash, dry and iron every type of curtain without shrinking, fading or damaging it, plus how to clean curtains you can't take down.